Amazon S3 Browser upload
Hold on Cowboy
This blog post is pretty old. Be careful with the information you find in here. The Times They Are A-Changin'
It’s 2018 and file upload is still an involved process
I’ll admit, this process is not straight forward, but once set up, it works like a charm. What’s the goal? We want the client (browser) to upload a file directly to S3 and then store the uploaded information in our server/database.
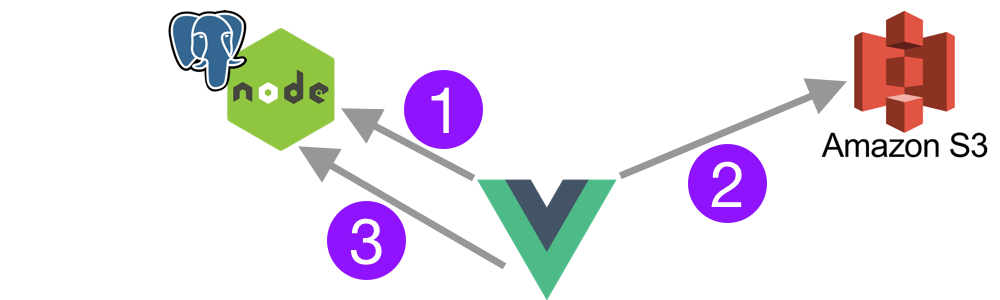
Overview of the workflow
- Client (browser) asks our server for a specially crafted URL and form fields to upload a file to our Amazon S3 bucket.
- Client POSTs the file to Amazon S3 with special URL
- After upload, client notifies our server of the file uploaded
- Our server stores that information in the Postgresql DB
Assumptions
- I’ll be using Vue.js and the outstanding DropzoneJS, but the workflow will be similar for React or Angular.
- I’ll be using Node.js + PostgreSQL, but you can use what you prefer.
- This is not entirely production ready, you need to have an authentication mechanism on your server. Store credentials in environment variables and more items that you should always do in production.
Set up Amazon S3
Create a bucket if you don’t have one already
Add CORS configuration to the bucket
<?xml version="1.0" encoding="UTF-8"?>
<CORSConfiguration xmlns="http://s3.amazonaws.com/doc/2006-03-01/">
<CORSRule>
    <AllowedOrigin>*</AllowedOrigin>
    <AllowedMethod>POST</AllowedMethod>
    <AllowedMethod>GET</AllowedMethod>
    <AllowedMethod>PUT</AllowedMethod>
    <AllowedMethod>DELETE</AllowedMethod>
    <AllowedMethod>HEAD</AllowedMethod>
    <AllowedHeader>*</AllowedHeader>
</CORSRule>
</CORSConfiguration>
Create an IAM Policy to allow uploads to your bucket. Maybe name it “upload-to-MY_BUCKET”
{
    "Version": "2012-10-17",
    "Statement": [
        {
            "Sid": "Stmt14546345345",
            "Effect": "Allow",
            "Action": [
                "s3:Put*"
            ],
            "Resource": [
                "arn:aws:s3:::YOUR_BUCKET_NAME/*"
            ]
        }
    ]
}
Create an API user just for uploading (choose Programmatic access). Apply the “upload-to-MY_BUCKET” policy to the user, then get their ACCESS_KEY_ID and SECRET_ACCESS_KEY.
Summary
In this section, we’ve created a bucket, a user, a policy that allows PUT to that bucket. Then we applied that policy to the user and recorded their ACCESS_KEY_ID and SECRET_ACCESS_KEY for later use. To top it off, we added the custom CORS XML so that clients can do cross domain uploads to that bucket. Now we’ll dive into the server side of things.
Node.js Server
Here is an en example Express Server setup, but if not, this will get you going. Make this the
index.jsfile.const express = require('express') const bodyParser = require('body-parser') const app = express() const cors = require('cors') // We'll create this file later const { signedUrl } = require('./middleware/s3') // Pull configuration variables from the environment const awsConfig = { accessKeyId: process.env.AWS_S3_ACCESS_KEY, secretAccessKey: process.env.AWS_S3_SECRET_KEY, bucket: process.env.AWS_S3_BUCKET, } // Enable CORS and process the body as JSON app.use(cors()) app.use(bodyParser.json()) // get signed URL // We are expecting the `filename` to be passed in the query // http://localhost:3000/signed-url?filename=example.png app.use('/signed-url', signedUrl(awsConfig), ) const server = app.listen(3000, function () { console.log('Server listening on 3000') })Now let’s setup the missing
./middleware/s3.jsfile as suchconst AWS = require('aws-sdk') // Function takes an object with the file name. // In the future you can add more query parameters here that can be considered when generating the S3 key function getDropzone({ filename }, bucket, client) { // Here you decide what you want to name your S3 filename (key) const key = `images/${filename}` // Parmas that we use to create our signature const params = { Bucket: bucket, Expires: 3600, Conditions: [ // This depicts the ACL the file will have when uploaded {'acl': 'public-read-write'}, {'success_action_status': '201'}, ['starts-with', '$Content-Type', ''], ['starts-with', '$key', ''], ], } // Use the aws-sdk method to create the signature const res = client.createPresignedPost(params) // Parameters taken straight from the example at // https://rowanwins.github.io/vue-dropzone/docs/dist/#/aws-s3-upload return { signature: { 'Content-Type': '', 'acl': 'public-read-write', 'success_action_status': '201', key, ...res.fields, // Additional fields submitted as headers to S3 }, postEndpoint: res.url, } } exports.signedUrl = function signedUrl ({ accessKeyId, secretAccessKey, region, bucket }) { // Start up a new S3 client const client = new AWS.S3({ accessKeyId, secretAccessKey, region, }) return function (req, res, next) { // FIXME: Don't forget to lock this endpoint down with some authentication return res.json(getDropzone(req.query, bucket, client)) } }Now we can start our server
node index.jsand it should be working on http://localhost:3000Try this curl command to test it out.
curl --request POST \
  --url 'http://localhost:3000/signed-url?filename=hello.jpg' \
  --header 'content-type: application/json'
Summary
In this section, we configured a basic server to generate our special signed URL to upload to Amazon S3. We used the AWS Javascript SDK method createPresignedPost to create the signature and special fields that our client will need to upload directly to S3. Next, let’s see how we can tie this together in Vue.js.
Vue.js
We’re going to use the module Vue Dropzone to make our job much easier.
I’m assuming you have Vue.js setup and working, so we’re just going to concnetrate on getting a component using the VueDropzone module.
We need to setup our template as such (in view, our template, script, and even style sections are all in the same file. Here you see we have configurations for
awss3and a generaloptions, we’ll take a look at then in a minute. We also have the event listener@vdropzone-success, which will handle a completed file upload<template> <div> <Dropzone id="dropzone" :awss3="awss3" :options="dropzoneOptions" @vdropzone-s3-upload-error="s3UploadError" @vdropzone-s3-upload-success="s3UploadSuccess" @vdropzone-success="dropzoneSuccess" /> </div> </template>Now for the meat of the matter. The configurations and methods of our component.
<script>
import Dropzone from 'vue2-dropzone'
import 'vue2-dropzone/dist/vue2Dropzone.min.css'

export default {
  components: {
    Dropzone,
  },
  data () {
    return {
      images: {},
      dropzoneOptions: {
        thumbnailWidth: 150,
        maxFilesize: 0.5,
      },
      awss3: {
        signingURL: (f) => {
          // The server REST endpoint we setup earlier
          const key = `http://localhost:3000/signed-url?filename=${f.name}`,
          // Save this for later use
          this.images[f.name] = f
          return key
        },
        headers: {},
        params: {},
        // We'll take care of pusting the image details to our server on our own
        sendFileToServer: false,
      },
    }
  },
  methods: {
    // Fired AFTER a file is successfully uploaded to S3
    dropzoneSuccess (file, res) {
      const { type: contentType, size, height, width, s3Signature: { key: path } } = file
      // Here you would POST/GraphQL to your own server the details
      const input = {
        id: this.unitId,
        image: {
          path,
          size,
          height,
          width,
          contentType,
        },
      }
      ...fill in details of saving data to your server
    },
    s3UploadError (errorMessage) {
      // Show an error message on failure
      console.log(errorMessage)
    },
    s3UploadSuccess (s3ObjectLocation) {
      // Show a message after uploaded to S3?
      console.log(s3ObjectLocation)
    },
  },
}
</script>
Summary
In this last section, we configured our Vue.js to use vue-dropzone to handle the File upload to S3 and then the details to our own server. It’s rough around the edges but you now have a way to allow anonymous strangers to upload to your secured S3 bucket.
See it in action
